

| Linux-Mandrake: |
| Install Guide |
MandrakeSoft
January 2000 http://www.linux-mandrake.com
This manual is protected under MandrakeSoft intellectual property rights. This manual can be freely reproduced, duplicated and distributed either as such or as part of a bundled package under electronic and/or printed format provided however that the following conditions are fulfilled:
For any other use, authorization must be requested and obtained from MandrakeSoft S.A.. Both "Mandrake" and the "Linux-Mandrake" brand name, design and logotypes are registered. All related copyrights are reserved.
The following people contributed to the making of this manual:
To help you understand better what is being explained, this document uses different fonts for topics with different interpretations. Some fonts are used for different kinds of objects; either the context will tell you which type of object is being referred to, or the exact distinction is not significant.
Note that the size of the font is automatically scaled to best fit the page width in the following environments. Most of the examples in this section use programs invoked from a command line, that is to say a terminal where you type commands. Refer to the corresponding chapter for more information on how to get a terminal.
# Snippets are presented like this.
# A snippet is an interaction in a
#   terminal between the user and
#   the computer.
# Lines beginning with a "sharp"
#    sign like this one are comments.
# Lines beginning with a "dollar" sign
#    ($) are commands you should type,
#    either as yourself or as root
#    (read the context to know that).
# Lines ending with a "backslash" (\)
#    are lines that continue on the
#    next line. Some programs support
#    this syntax.
# Other lines are the computer messages
$ file /dev/null
/dev/null: character special (1/3)
$ echo Hello \
  World
Hello World
$ echo Hello World
Hello World
# Literal portions of configuration files
#   are displayed like this. Often, lines
#   beginning with a "sharp" (#) sign are
#   comments.
# assign a value to the FOO variable
FOO="My value"
command <non literal argument> [optional argument ...]
It is very important to understand how to interpret the special signs in syntaxes.
The "greater than" and "less than" signs denote an
argument not to be copied verbatim, but to interpret before you do so.
For example, <filename> refers to the actual name of the file. If
this name is foo.txt, you should type foo.txt, and not
<foo.txt> or <filename>.
The square brackets denote optional arguments, which you may or may not include in the command.
The continuation points mean that an arbitrary number of items can be included there.
The syntax used in these pages is representative of syntax you will see in the synopsis of the system's manual pages.
Material you should type literally is displayed like this.
Messages the computer spits are displayed like this.
This manual uses a number of different fonts (which can sometimes be combined) to help you distinguish the semantics or nature of the words used. They will appear in the following manner:
:)
This font is used to show commands you should type as is
in a terminal.
'This font' is used to show variable names.
This font is used to display filenames.
command <argument>. See
above to know how to read the contents of a syntax.
This font is used to display a literal message, or
something you should type literally.
This font is used to display options.
http://machine/path/.
user@domain.xyz.
comp.os.linux.
Escape.
'a'.
user.
command(section).Note: remarks to take into account are presented this way.
Warning: important remarks are displayed like this.
This manual was typeset with LaTeX. Perl and GNU Make
were used to manage the set of files involved. Pictures have been shot
with xwd and converted with convert (from the
ImageMagick package). PostScript files were produced
with dvips. All of these pieces of software are available on
your Linux-Mandrake distribution, and all are free software.
The aim of this manual is to help you to install Linux-Mandrake
on your PC. The setup program used is the new
graphical setup program: DrakX.
You will first be given instructions for steps to take before proceeding to the installation, such as: finding information on your hardware, configuring your BIOS, and, where applicable, creating a bootdisk.
We will then give you details on Lnx4Win. Lnx4Win allows you to install Linux-Mandrake on your PC without re-partitioning your hard disk. Although this is the easiest setup method, it has several disadvantages which will be explained.
For those of you who want a standard installation, you will find help with partitioning: a whole section will be devoted to the concepts behind partitioning a hard disk including details on how Linux and Windows handle partitions. This should help you when you have to partition your hard drive, but DrakX can handle this automatically.
And finally we will look at the installation itself.
Any suggestions you have regarding this manual (an omission, an
error, even a spelling mistake) will be very welcome. You can send an
e-mail to documentation@mandrakesoft.com. We will welcome any
comments on comprehension with open arms.
The BIOS (Basic Input/Output System) is used to boot up a computer. Specifically, it is used to find the device on which the operating system is located and to start it up. It is also used for the initial configuration of the hardware.
The appearance of plug'n'play and its widespread use means that all modern BIOS can initialize these devices, but you still have to ask it to do so. If your Windows 9x is initializing these devices instead of the BIOS, this will need to be changed for use under Linux.
Changing your BIOS settings is most often performed by holding
down the DEL key during startup. Unfortunately, there are many
types of BIOS in use today and they each have their own
technique, you will need to find out what works for your PC. Once you
are in the BIOS, the option to look for is often called
PNP OS installed (or Plug'n'Play OS installed). Set
this option to No: the BIOS will then initialize any
plug'n'play devices and that can help Linux recognize
some devices in your machine which it would not otherwise.
If your BIOS can boot up from the CDROM and you want to perform a standard installation of Linux-Mandrake (not using Lnx4Win), you can also set your BIOS to boot from the CDROM before searching the hard disk.
If your BIOS cannot boot from the CDROM, you will need to create a bootdisk: the CDROM contains all the files needed to do so. You will also need to create a bootdisk if you wish to use System Commander. If you will be using Lnx4Win you will not need a bootdisk, so you may skip this step and go on to Chapter 5.0, which deals with Lnx4Win.
The boot-up images are in the images directory on the CDROM.
Two files in particular will help you: the files cdrom.img and
txt_boot.img. The first file is the one needed to perform a
graphical installation. If the graphical
installation doesn't work for you, you will have to install using text mode, in
which case, you will need to use the txt_boot.img file.
You will need to use the program called rawwrite. This can be
found in
the CD dosutils directory (figure 4.1).

dosutils directoryNote: in this example, the CDROM drive is designated by the
letter D:; you will naturally have to choose the letter
designating the CDROM drive on you machine.
Please note that there is a DOS version, rawrite, of
the same program (it is, in fact, the original version of the program;
rawwrite is merely a graphical frontend to it).
Start the program, as shown in figure 4.2.

rawwrite programSelect the boot image to copy and the target device (example in figure 4.3).

rawriteThen, if you haven't already done so, insert an (empty!) disk into your chosen device and click on Write. You now have a boot disk to install your Linux-Mandrake distribution.
If you already have Linux installed (on another machine, for example, or on that of a friend who has lent you his Linux-Mandrake CD), then carry out the following steps:
/mnt/cdrom;
root;
$ cp /mnt/cdrom/images/cdrom.img /dev/fd0
Replace /dev/fd0 by /dev/fd1, if you are using the second
disk drive and, of course, the name of the image with the one you want.
Your boot disk is now ready.
Linux-Mandrake can handle a large number of hardware devices, and the list is far too long to be quoted in its entirety here. Nevertheless, some of the steps described in this chapter will help you ensure that your hardware is compatible (or not) and, where applicable, to configure some of the problematic devices.
Some types of hardware cannot presently be handled by Linux, either because the support is still in experimental stage, because nobody has written a driver for the devices in question, or because it has been decided that they cannot be supported, for often valid reasons. For example:
Linux's hardware resources are now highly developed, and, apart from the devices mentioned in the previous section, you can expect the rest of your hardware to be accepted, and even more.
However, some types of devices are still having problems with Linux, and, in particular, ISA plug'n'play devices. However you can use Windows to find out their configuration. Right-click on the My Computer icon, choose Properties, select the tab Devices Manager, then select View devices by connection (figure 4.4).

If you have ISA devices, you must view them when you bring up the directory structure (figure 4.5).

You will be able to find the ISA devices in this part of the directory structure. If you only see one entry for the data port, ignore it. If there are devices present, and if there is no conflict, you can then select and click on the button Properties (figure 4.6).

You will have to write down the basic address(es) (Input/output range) used, together with the IRQ(s). Also note down the DMA channel(s) used for the sound cards.
If your ISA card is plug'n'play, you will have to be careful
to configure your BIOS properly, as instructed in the preceding
section but, even if you do so, Linux may not find it. However,
you can disable plug'n'play for the particular device: if the
manufacturer has provided one, you should have a disk containing a
program enabling you to carry out this procedure. Generally, it is the
device's own setup program which does so. If you have this
sort of program, start it up, set the device's configuration with the
parameters used and disable the plug'n'play: Linux can
then see it as soon as it is set up.
Don't worry too much about sound cards, though: you may configure them
after installation, and not during installation. The sndconfig
program uses the isapnp package, which is the only program
under Linux able to handle such devices.
Lnx4Win (Linux for Windows) is what you need if you don't want to partition your hard disk at all. This program will create two files on your Windows partition which will hold your Linux-Mandrake system: one file for the data and another for the swap. This installation mode is undoubtedly the easiest, but, as has already been mentioned, it has its disadvantages:
However, this is a good way to discover Linux-Mandrake without tampering with your hard disk. For normal installation, you can skip this chapter.
All the programs required are to be found in the lnx4win
directory of the CDROM (figure 10.1).

lnx4win directoryYou will have to start the install.bat program which will install
the files you need to run Lnx4Win. This is the install
icon in figure 10.1. You should see the window of
figure 5.2 appear.

Press a key. The program will ask you for the letter designating your
CDROM drive, together with the letter corresponding to the
"drive" where you want to install Lnx4Win (C: or
another). Upon reception of this information, the program will end
(figure 5.3).

You are now ready to start the Lnx4Win setup program.
The script needed to start installation, still in the lnx4win
directory of the CDROM, is called setup.bat (icon
setup). After starting this script, you should be able to see
the window of figure 5.4.

You now have to decide on the amount of space you want to keep for Linux-Mandrake on the partition that you selected in the installation script. The figures are in MB.
Linux Native shows the space to keep for Linux-Mandrake data; choose a margin, because the quantity that you allocate here must be able to hold the file system, as well as the files themselves, and your personal data. For your information, a complete installation takes up more than 1.1 GB, and the size of the file created should not be more than 2 GB.
Linux swap shows the size of the file created for the swap. As a general rule, put 64 MB if you have 64 MB RAM or less, otherwise an amount which is equal to your RAM.
There are also three options:
config.sys file so
as to create a menu when Windows boots up, so that you can
choose whether to boot up Windows or Linux-Mandrake; a back-up
copy of your old config.sys will be made, called
config.mdk;
Your files have been created, your Linux-Mandrake system is now ready for installation (figure 5.5).

From this point on, installation will be carried out as a traditional installation, so go to the chapter 7.0, dealing with the installation with DrakX.
Uninstallation is very simple: you simply have to start the script
uninstall.bat, always in the lnx4win directory of the
CDROM. However, the script will not delete the installation
directory: you will have to do that by hand. The name of the directory
is lnx4win and is located in the "drive" where you
have installed Lnx4Win.
If you are reading this chapter, it means that you have decided on a
standard installation of Linux-Mandrake, which will require
re-partitioning. Or, you are simply curious, and you are right :)
Most of you won't have ever used the DOS
fdisk program, and so have never re-partitioned a disk. For
those of you who have already used it, forget what you know: this
program only offers a very limited view of what partitioning really is.
To simplify, a hard disk is merely a sequence of sectors. A sector is the smallest data unit on a hard disk, and its size is 512 bytes. The sectors on a hard disk of n sectors are numbered from 0 to n-1 .
The first sector (including the sector number 0) contains, amongst others, the table of partitions. As its name suggests, this table contains data on the various partitions on the disk. It can contain a maximum of 4 entries, dividing the disk into four partitions called primary partitions. Each entry on the partition table contains various data, and in particular the number of the sector where the partition begins, the number of the sector where it ends and, finally, its type. An entry may contain nothing.
Normally the partition type specifies the filesystem which the partition is supposed to contain. Each operating system recognizes some of them, but not others. Windows, for example, assumes that each partition whose type proves the presence of a FAT in fact contains a FAT[1]. For Windows, this sort of partition becomes a drive. But there is also a very special type which ensures that a primary partition becomes a partition called extended.
There can only be one extended partition per disk. This type of
partition exists for various reasons: mainly because it can partition a
large hard disk into more than 4 partitions. Then, because of the
limitations of the DOS/Windows fdisk, which is
unable to create more than one primary partition per
disk[2].
Apart from its type, which distinguishes it, an extended partition has the same features as a primary partition, that is a start and end sector number. The space thus allocated to the extended partition is then subdivided into logical partitions using another table with a different format from the table of primary partitions, since the number of logical partitions is only restricted by the space on the disk. It should also be said that there can only be a single extended partition per disk.
The first entry of a logical partition table can be found on the first sector of the extended partition. The start and end sector of the logical partition of each entry appears in the same way, as does its type and the sector number where the following table entry can be found.
The illustrations in this section will help you to understand the partitioning of a disk. For this, the most standard cases have been shown in illustration.
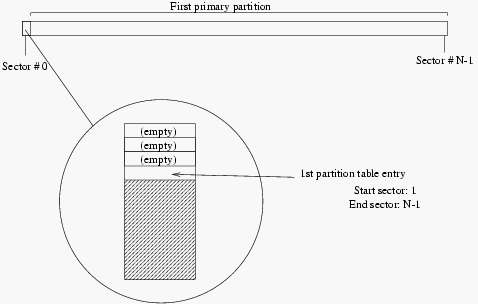
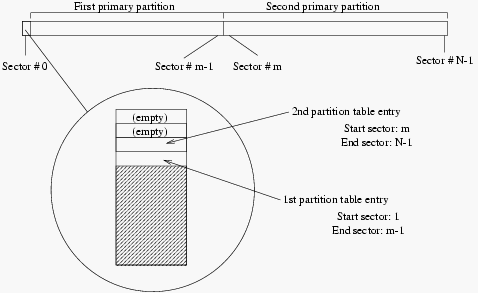
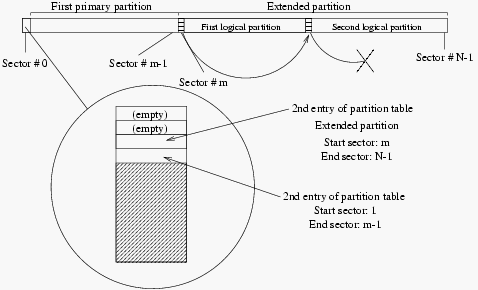
What you could do, for example, is to partition a disk in the state of the first diagram and take it into the state of the second diagram (which is what System Commander can do, for example). Finally, we should add that the partitioning of a disk does not have to cover all the space on the disk. So you can keep some unused space on your disk and use it later.
To complicate things further, the method used by Windows to name the partitions, and that used by Linux, are totally different. The main difference is due to the fact that Windows depends on the partition type to allocate letters to the "drives", while Linux depends on the position of the disk in the chain (IDE or SCSI) and on the partitioning of each of the disks, but does not take the partition types into account at all.
As we have already said, Windows allocates letters to the drives depending on the partitions that it finds of a type that it recognizes. Windows never names a disk, only partitions.
So there is never a disk C:, but a drive
C:. This C: "drive" is subject to certain
restrictions: it has to be a primary partition of a type which
is recognized by Windows, and on the first disk seen by
BIOS. And finally, this partition must be enabled... This, as a
general rule, is the first IDE disk on a PC equipped only with
IDE disks or the first SCSI disk on a PC on which SCSI alone
has been installed.
The allocation rules for the remaining "drives" are somewhat quaint:
A: and B:.
This explains why the letter designating your CDROM, for example, is
shifted when you add a disk containing at least one Windows
partition.These few diagrams will help you: they show a computer with two disks installed, one being a master primary IDE and the other the slave primary, partitioned in a different way each time:
C: and D: are then allocated
as in figure 6.4.
C:
to F: (figure 6.5).
Linux uses a far more logical method for naming partitions. Firstly, it does not take into account the type of partitions that you may have, and secondly it names the partitions according to the disk on which they are located. First of all, this is how the disks are named:
/dev/hda and
/dev/hdb respectively;
/dev/hdc and
/dev/hdd for the master and slave respectively;
/dev/hde, /dev/hdf, etc.
/dev/sda, /dev/sdb, etc.,
in the order of their appearance on the SCSI chain (depending on the
increasing IDs). The SCSI CDROM are called /dev/scd0,
/dev/scd1, always in the order of their appearance on the SCSI
chain.The partitions are named after the disk on which they are found, in the following way (in the example, we have used the case of partitions on a primary master IDE disk):
/dev/hda1
to /dev/hda4 where present;
/dev/hda5, /dev/hda6, etc. in their order of appearance in
the table of logical partitions.By referring again to the two diagrams 6.4 and 6.5, Linux will name the partitions as follows:
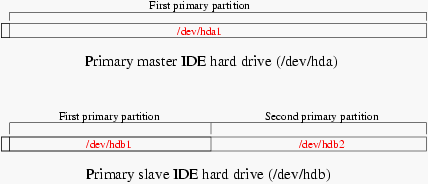
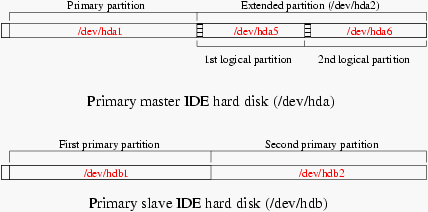
So now you can name the various partitions and hard disks when you need them. You will also see that Linux names the partitions even if it does not know how to manage them initially.
DrakX is the new program for installing Linux-Mandrake. It is a great improvement over the old installation program: it has a totally graphical interface, is very easy to use and allows you to go back at any time to previous configuration steps, even choosing the type of installation that you want depending upon your skill level.
When you insert your Linux-Mandrake CD (or your boot-up disk), after the boot-up procedure, you get what is shown in figure 14.1.

DrakX is "theme-able"! If you don't like the default theme, you can always change it by clicking on one of the three bars on the bottom left. You can do this during any part of the installation procedure.
So much for the attractiveness side :) Now let's go on to a few
practical considerations.
On the left, you can see the various installation steps. Depending on the level of progress of the installation, some stages will or will not be available. If they are available, they will be highlighted when you move the mouse cursor over them.
The buttons representing the various stages can also be of different colors:
This guide assumes that you are performing a standard, step-by-step installation as shown in the following screenshots.
The first step is to choose your preferred language.
As soon as you have selected the language, you will automatically go on to the next stage:
After choosing the installation type you want, DrakX will ask you what installation class you want (figure 7.2).

This manual will concentrate on the Recommended installation
class! If you choose another class, it probably means that you
have previous experience with Linux and can go through the various
sections without the help of this manual :)
After selecting the installation class, DrakX will try to detect a SCSI PCI device on your system. If such a device is found, DrakX will automatically install the right driver (figure 7.3).

Should auto-detection fail, your SCSI card is probably an ISA: in this case, don't forget the information that you obtained from Windows, since these are the options that you need to send to the driver:
io=0x400 irq=5
The help text speaks for itself: you will want to choose Install to install Linux for the first time on your machine (or to re-install on top of an existing installation), or Upgrade to update a previous version of Linux-Mandrake (figure 7.4).

Here too, DrakX will have selected the right keyboard for you (depending on the language you have chosen). However, you might not have a keyboard which corresponds exactly to your language: for example, if you are an English speaking Swiss person, you will want your keyboard to be a Swiss keyboard. Or if you speak English but are located in QuΘbec, you will find yourself in the same situation. In both cases, you will have to go back to this installation step and select a keyboard from the list (figure 7.5).

All you need to do is select the right keyboard from the list which appears in front of you.
Now you need to specify in DrakX where the various partitions on the hard disk(s) will be mounted. In Recommended mode, normally you won't have anything to do. If you have only a Windows partition it will be automatically resized and both the Linux partition and swap space will be created and formatted. Otherwise, if you have several Linux partitions, you should see on your screen a window looking like figure 7.6.

The Linux partitions are displayed in red. You must also have a green
one for swap. You just have to select the (red) partition you want with a mouse
click: a menu will then appear in the window on the right, in which you will
select Mount point. The window which appears then will ask you where
you want to mount it, and proposes / as a default, which is what you
want. If you want to have several mount points, you just have to repeat the
operation, but we won't say more here: if you indeed already have several
partitions on the disk, it means that you already know the principles :)
You can configure the clock according to the time zone you are in.
Here, you can choose the time zone in which you are located. (figure 7.7).

When printing from Linux, you need two things: first, you have to configure the access mode to this printer (local, remote) in order to access it; second, you have to configure the print filter, which varies depending on your printer model. To configure a printer, you will, of course, have to answer Yes to the question of figure 7.8.

Linux supports several types of printers: apart from the printers physically connected to your machine (Local printer), you will also be able to print on shared network printers.
Several scenarios are possible:

Whatever type your printer is, DrakX will ask you whether you want to test your configuration. In the event of a failure, you will be able to start over as many times as needed.
If you have a local printer, DrakX will try to detect the make and model: modern printers support this feature. Were it not to succeed, it will then ask you what port your printer is connected to. If you only have one printer, always choose /dev/lp0 (figure 7.10).

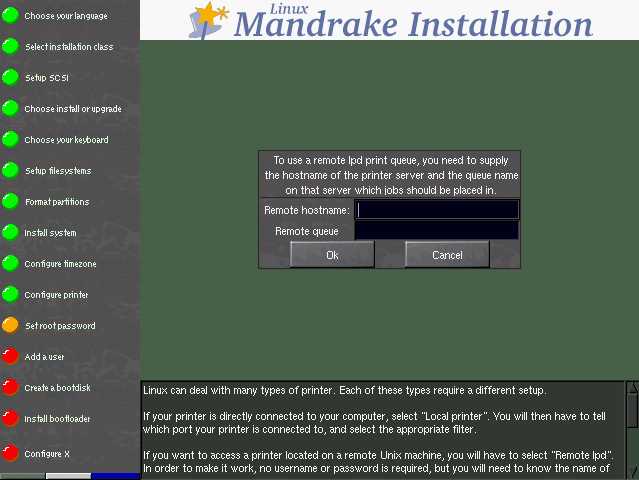
If you have access to a Unix printer, you will have to enter the name of the machine which serves the printer, and the name of the queue corresponding to this printer on the server (this does not have to be the same name as the one you have given locally); (figure 7.11).
If you want to configure printing on an SMB printer, you will have to be careful about one thing in particular: the name of the machine that you have to provide is not the name associated with this machine by DNS! SMB has its own way of naming the machines, and when Linux wants to print on this printer, it will talk to the print server using the SMB protocol. So find out the name of the server from your system administrator. You will also be able to specify the print server's IP address. Finally, you will have to enter the user name, password and work group required to access the printer (figure 7.12).

For Netware printers, the options are almost the same, with the name posing a problem again: this is the name associated with the machine by the IPX protocol (the protocol used by Netware). So you will have to ask the network administrator for it. You will also have to enter the user name and password that you need to access the printer (figure 7.13).

After configuring the type of access to the printer, you then have to configure the print filter: this is what will enable the printing system to transform the documents you want to print into data that the printer can understand (figure 7.14).

If you see no precise reference to your printer in the list of drivers which DrakX offers you, choose the most similar driver. Various options for configuring the driver you have chosen will then follow (figure 7.15).
First of all, you have to choose the paper size. The standard size is A4, but your mileage may vary. The resolution will depend on the capacities of the particular driver for your printer.
The option Eject page after job is useful for some printers which, in fact, do no eject the last page of a print job by default. Note that if your printer does not need this option, you will quickly see it during your tests: each time a print job ends, it will eject another white page...
The Fix stair-stepping text means that you can avoid a zigzagging effect on your print jobs. Answer Yes if you are not sure, but printers suffering from this defect are very rare.
Finally, you have to set the resolution for this printer. This will depend on whether the driver is Uniprint or not. If it's not (which is the case in figure 7.15), you will have a Resolution menu with the different resolutions which the drvier can handle. If it is Uniprint, this same menu will be called Uniprint driver options and you will have to refine your printer description. The resolution will be set according to this choice.

This is the most crucial point for the security of your Linux
system: you are going to have to enter the root password
(figure 7.16). root is the system
administrator and is the only one authorized to make updates, add users,
change the overall system configuration etc. In short, it can do
everything. That is why you have to choose a password which is
difficult to guess! DrakX will tell you if it is too easy. As
shown, you can choose to not enter a password, but we strongly advise
you to enter one!

root password setupYou will have to type the password twice -- a typing error in the first attempt could be a problem if you do not repeat it when you connect up to the system...
You now have to add a new, non-privileged user to the system
(figure 7.17). Unlike
root, which is the administrator, this user will not be
entitled to change anything, except his own files and his configuration.
You will have to create at least one for yourself, and that is where you
have to begin: although it is very practical to log in as root
everyday, it is also very dangerous! The slightest mistake could mean
that your system would not work any more...

First you have to enter your real user name. This is not compulsory, of
course -- you can enter what you want. DrakX will
then take the first word you have entered in the box and will bring it
over to the User name. This is the name you will use to log
into the system. You can of course change it. You then have to enter a
password here. Of course, a non-privileged user's password is not as
crucial as that of root from a security point of view, but that
is no reason to neglect it -- after all, they are your files...
If you click on Accept user, you can then add another, and as many as you want. When you have added all the users you want, select Done.
DrakX will now ask you to create a boot disk for your Linux system (figure 7.18).

There are several reasons for this:
So you are strongly advised to say Yes here! Of course, the floppy disk inserted must be empty or must only contain data which you do not need. You will not have to format it: DrakX will rewrite the whole disk.
LILO (LInux LOader) is the boot loader for Linux. This stage is normally totally automated. In fact, DrakX will analyze the disk boot sector and will act depending on what it finds here:
If in doubt, DrakX will ask you where you want to install LILO (figure 14.19).

If you use System Commander, answer First sector of boot partition. If you want to use LILO instead of System Commander to start the machine, choose First sector of drive (MBR).
X (for X Window System) is the heart of the Linux graphical interface on which all the graphics environments bundled with Linux-Mandrake rely (KDE, GNOME, AfterStep, WindowMaker...). In this section, DrakX will try to configure X automatically.
It is extremely rare for it to fail. The only reason for it doing so is if the hardware is very old. If it succeeds, it will start X automatically, with the best resolution possible, depending on the size of the monitor! A window will then appear and ask you if you can see it (figure 7.20).

If you answer Yes, DrakX will then ask you if you want to start X directly on boot-up: this will give you the ability to directly run the graphical interface upon booting the system.
It can happen, though, that the first try isn't the good one (screen is too small, shifted left or right...). This is why, even if X starts up correctly, DrakX will then ask you if the configuration suits you and will propose to change it by displaying a list of valid modes it could find, asking you to select one.
There you are. Installation is now complete and your Linux
system should be ready to use. You can start Linux or
Windows, whichever you prefer, as soon as the computer has
booted up again. To access Windows on your new Linux
system, at the LILO boot: prompt the TAB key to display
your options.
To start Linux you can just press the Enter key since
this is now the default selection. To launch into Windows, just
type windows. Your chosen system will start up automatically.
Note: this applies in case you chose Linux as a default in the LILO setup.
Do not forget what we have already said: if you have to reinstall Windows one day, you will not see this invitation! So do not forget your emergency disk...
Not all the devices have been configured upon installation. The task of this section is to help you to configure the most common devices: modems, sound cards, ZIP drives and the configuration of X Window System if you were not able to configure X during installation or you are not satisfied with the adjustments.
If you are in X Window System, you will have the KDM screen in front of you (figure 8.1).

As you have to configure the system, you then have to connect as
root. You will have to type the password blind, then
select OK. You will then go into the KDE environment
by default (unless you have selected another).
If X has not been configured for you, you will find yourself in console mode (figure 8.2).

The procedure is practically the same. Type your user name when invited to, and the system will ask you for your password, which you will then again have to type blind.
All the steps described in this section will be on the command line, so if you are in X, you will have to open a terminal. In KDE, an icon is available on the control panel, and this will give you direct access (figure 8.3).
Configuration can begin from here.
As has already been mentioned, winmodems are not supported. If you have a PCI modem, it is highly probable that it is one.
If you have a real modem (that is, an external modem), Linux
will have no problems operating it. The only thing you will have to know
is the serial port to which it is connected. The equivalent of COM1
in Linux is /dev/ttyS0, the equivalent of COM2 is
/dev/ttyS1, and so on.
Assuming that your modem is on COM2, you then type the following command:
$ ln -s /dev/ttyS1 /dev/modem
and that's it!
To test whether your modem works properly, you simply have to launch the
program called minicom in console mode. Initially, the program
will send an initialization chain to the modem. If your modem is
working, it will answer OK. Type Ctrl-A x to
leave minicom.
The program to start is called sndconfig
(figure 8.4).
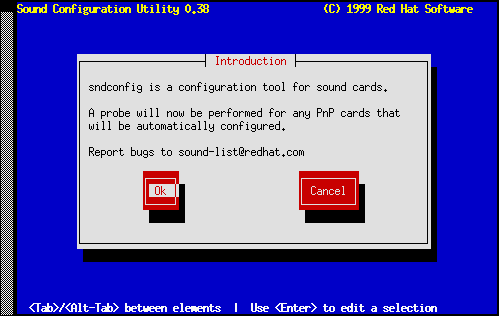
You simply have to press Enter to validate. It will then detect
the sound card, whether it be PCI or ISA. The detection process
result is reported as in figure 8.5.
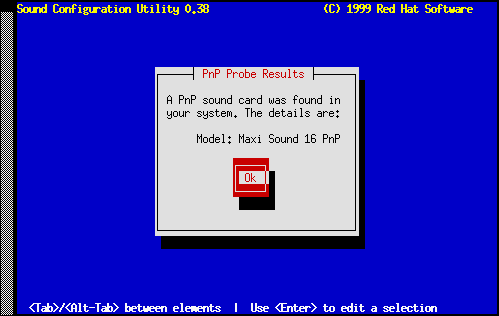
Then press Enter again.
Note: successful detection does not mean that the sound card is in fact supported...
If the sound card is supported, the program will then change your configuration files and insert the modules needed to start it up, and will play a sound sample (figure 8.6).

If you do not hear this and are sure that everything has been properly
connected, unfortunately you won't get sound in Linux... But you
should report the detection result by e-mail to the address
bugs@linux-mandrake.com. This will enable us to let you know when
your sound card is supported, with instructions on how to operate it.
If all has gone well, all that remains to do is to configure the MIDI
support if your sound card can do so. Here too, sndconfig will
decide whether your card can do it and will insert the corresponding
modules if it recognizes the sound card.
Then it will play a MIDI sample (figure 8.7).

After launching sndconfig, you won't need to reboot! Your
sound card has been configured and is operational from now on. In the
sub-menu, Multimedia in the KDE K menu, you
will find several programs enabling you to handle your sound card. In
particular, the Sound mixer will regulate the volume on the
various channels. There is even a mixer in console mode:
aumix.
ZIP drives are certainly the most widely used back-up supports in today's PC world. Linux has supported them for a long time in all the existing versions: by parallel port, SCSI or IDE. SCSI or IDE drives are configured automatically, but this does not apply to parallel port drives. However, even in the case of IDE or SCSI ZIPs, there will not be a preconfigured icon on the KDE desktop, but we are going to create one in the second part of this section.
The problem with parallel port ZIPs is that the two versions (100
MB and 250 MB, also called "ZIP Plus") are
managed by two different modules: ppa ("normal" ZIPs) and
imm (ZIP Plus). Depending on your model, you will have to type the
following command line at the prompt, always as
root:
$ modprobe ppa
or:
$ modprobe imm
When this has been done, your ZIP drive is operational. All that remains to do is to specify where you are going to mount it, in order to be able to see its contents. To do this, you will have to know what file designates it.
The most common case will be the absence of any SCSI disk. If this is
the case, your ZIP will be called /dev/sda. If you have a
SCSI adapter with SCSI disks on it, you will have to know how
many: your ZIP drive will then be known as a /dev/sd<x>
device, where <x> is a letter of the alphabet which depends on
how many SCSI disks you have. If you only have one, it will be
b; if you have two, it will be c, and so on.
Now you have to specify where to mount it. For this, you have to create
a mount point. As a rule, this will be /mnt/zip:
$ mkdir -p /mnt/zip
Then, for clarity, you can create a link with the device file locating
the ZIP in /dev/zip:
$ ln /dev/sda4 /dev/zip
This stage is naturally not compulsory, but it is carried out in order to maintain compatibility with the way in which the installation program has configured an IDE or SCSI ZIP.
Please note that the device mentioned is /dev/sda4 and not
/dev/sda (similarly, you would put /dev/sdb4 instead of
the filename /dev/sdb): this is because of the general
partitioning of the ZIPs. Those of you who know Linux know
that the ZIPs can be repartitioned, but keeping the original
partitioning guarantees that it will operate in the same way in
Windows and Linux.
Finally you have to complete the /etc/fstab file so that the
ZIP is acknowledged:
$ echo '/dev/zip /mnt/zip vfat noauto,user 0 0' \
       >>/etc/fstab
From here, you can access your ZIP from the command line using the
commands mount and umount (see the
Reference manual). However, you can also configure KDE
for mouse access, which we will describe below.
To create an icon for the ZIP on your KDE desktop, right-click on an unoccupied part of the desktop and select New/File System Device. You will then have the sort of window of figure 8.8.

Give it a specific name (for example, ZIP.kdelnk) then select
OK; a window will appear and you can select the tab
Device. Fill it in so that you get this what is shown in
figure 8.9.

Note: for the icons, you simply have to click on the default icon and a list of available icons will then appear. The two icons selected are easy to find because they are the last two.
Your ZIP drive has now been configured and you can access it by simply clicking on the desktop.
framebuffer is the last solution remaining if your card is not accepted natively by XFree86. Framebuffer supports virtually all modern graphics cards, but to get it to work you have to take a certain number of steps.
The first thing you will have to do is to replace the kernel with a kernel which supports framebuffer, and the X server which can run it. You will therefore need your Linux-Mandrake CD. Insert it in the drive and mount it:
$ mount /mnt/cdrom
Then install the packages you need:
$ cd /mnt/cdrom/Mandrake/RPMS
$ rpm -i kernel-fb*
$ rpm -i XFree86-FB*
$ rpm -i XFree86-VGA16*
$ cd
$ umount /mnt/cdrom
You may now eject your CDROM.
You now have to tell LILO that you want to start your new
kernel. To do so, you have to edit your /etc/lilo.conf file (see
the Reference manual on using a text editor) and add a section which
resembles this one (replace the partition behind root= by whatever
suits your system!):
image=/boot/vmlinuz-2.2.13-7mdkfb
        label=fb
        root=/dev/hda1
        vga=0x316
        read-only
You will also have to tell it which video mode you want: this is the
task of the vga= directive in the section. The example shows a
resolution of 1024x768 in 16 bits (65536 colors). The table of video
modes is the following; choose the one you want:
| 648x480 | 800x600 | 1024x768 | 1280x1024 | |
8 bits | 0x301 | 0x303 | 0x305 | 0x307 |
16 bits | 0x310 | 0x313 | 0x316 | 0x319 |
24 bits | 0x311 | 0x314 | 0x317 | 0x31A |
32 bits | 0x312 | 0x315 | 0x318 | 0x31B |
Now you need to make changes to LILO:
$ lilo
Then you have re-start the machine:
$ reboot
When the LILO prompt appears, type fb then Enter:
LILO boot: fb
If the new kernel boots up correctly, you can then edit your
lilo.conf, replacing the line:
default=linux
by:
default=fb
then retype lilo once again. This will then be the kernel
which starts by default.
Now you have to go on to configure X itself. You first have to
generate a configuration file. To do this, start the program
Xconfigurator, again as root.
When Xconfigurator asks for your card, choose
Unlisted Card (right at the bottom). Choose VGA16 as
the server.
As usual, choose the right parameters for your monitor. When
Xconfigurator asks you to configure the monitor, you will
choose Do not test.
Then you will have to specify the amount of video memory on your card. To configure the clock frequency, validate the default choice: No clockchip setting (recommended).
Xconfigurator will then ask you if you want to start the
command X -- probeonly. Again reply Skip, and give
the same answer when it wants to test your current X
configuration.
Your configuration file has now been written and you will have to change
it so that it uses the right X server. The file to be changed is
called /etc/X11/XF86Config.
First of all, look for a Screen section in this file. A
typical section looks like this:
Section "Screen"
    Driver      "vga2"
    Device      "Generic VGA"
    Monitor     "My Monitor"
    Subsection "Display"
        Modes       "640x480" "800x600"
        ViewPort    0 0
    EndSubsection
EndSection
It may be different for you. In particular, you can have several
sub-sections under Display. So change the section to this:
Section "Screen"
    Driver      "fbdev"
    Device      "My Video Card"
    Monitor     "My Monitor"
    DefaultColorDepth     16
    Subsection "Display"
        Depth       16
        Modes       "default"
        ViewPort    0 0
    EndSubsection
EndSection
Note: replace 16 by the depth you have chosen!
The last thing to do is to ensure that the default X server is the one you want:
$ cd /etc/X11
$ rm -f X
$ ln -s $(which XF86_FBDev) X
And that's it! You now just have to test it to be sure that everything is working properly:
# startx
If everything is working as you would wish, you can then ensure that
X is activated at bootup. For this, you have to edit the file
called /etc/inittab and replace the line
id:3:initdefault
by:
id:5:initdefault
You can enable the graphical login from now on:
$ init 5
The installation and post configuration is now over. You can now refer to the User Guide and enjoy the use of your Linux-Mandrake system and read the User Guide and Reference manual. Have fun!
0x55 and 0xAA, and otherwise 0.